Pages

▼
Drop Down MenusCSS Drop Down MenuPure CSS Dropdown Menu

Gear Up for Adventure on a Shoestring Budget

Are you itching to head out into the wilderness on your own adventures but can't afford the gear you need? This is the series for you. You'll learn what to look for and where to find it to get what you need for one-tenth of the cost of new gear.

This post is the where, but not the how. Stay tuned for upcoming posts in which I'll cover how to shop for used clothing, kayaks, backpacks and more.


Rules of Frugality
I love this list, and I use it when I'm tempted to buy something new. If you think you need to buy something, start at the top, and hopefully you'll find a solution before you get to #6. 
  1. Find an alternative you already own 
  2. Borrow it 
  3. Rent it
  4. Buy it used
  5. Pitch in with another person to get it
  6. Buy new
Another rule of frugality is caring for what you already own. This means knowing how your gear should be stored and cleaned to make it last as long as possible. I'll get around to writing a post on that at some point, hopefully...

Click the keep reading to learn where and what to buy used....

DIY Outdoor Gear Resources to MYOG


MYOG DIY outdoor gear making resources

I love making things myself. I've always dreamed of having my own outdoor brand- not a very feasible business idea that I would probably end up hating in the long run. With all the technical fabrics available online, we are no longer bound to the products made by big outdoor brands. You'll find fabric, patterns and tutorials online for everything from backpacks to tents to sleeping bags and rain jackets. I've put together the resources I go to when I have a project. If you know of any that I haven't listed, please mention them in the comments.


Forums
HammockForums.net This forum is the go-to spot for hammock camping tricks. There is a forum for all things DIY, just don't post with tent making questions as it is a hammock camping only forum.

WhiteBlaze.net This is a community of Appalachian Trail enthusiasts with TONS of info on the AT- you can get answers to all your AT questions. There is also a forum on here for DIY gear.

BackpackingLight has forums dedicated to a variety of topics including a MYOG Forum (make your own gear) To post to the forum you must have a basic membership to the site which costs $5 a year

Backpacking.net has a little corner of their website dedicated to a MYOG forum. 

MYOG on Reddit - A fantastic forum full of resources, projects and advice

DIY 20°F Ultralight Backpacking Quilt Part 4-
Final Touches and Thoughts

Final Touches

Installing the Cord / Bungee

  • Cut your cord or bungee at least 6 inches longer than the length of your casing. This will make it easier to tie knots in once it is in place. 
  • Use some wire (I used a paper clip) to create a hook that will enable you to feed your cord through the casing
  • I used glow in the dark paracord because I had a bunch laying around. To reduce bulk and weight, I removed the core strands. 

My hook made from a paperclip
Drawcord with mini-cord locks installed


DIY 20°F Ultralight Backpacking Quilt Part 3 - Pinning and Sewing


Stacking and Pinning

If you are using thick insulation like I am, you will definitely need 'quilting' length straight pins. Using regular length pins will not work. I bought 1 3/4" pins for 7.5oz Climashield and it worked. If I had 10oz I would need longer pins. 
  • Pin your Shell and Liner fabric with right sides together. If your fabric has a side that is more shiny, that is the 'wrong' side
  • Sandwich the straps or draft flaps between the shell and liner, with the end of the strap/flap you want to be on the outside edge of your quilt pointing toward the center line of the quilt
  • After you've pinned the shell and liner to each other, pin the insulation on the bottom to them. The insulation will run against the feed dogs of your sewing machine


How To: Pro-deals on Outdoor Gear

Outdoor gear is expensive, and if you're like me, you're hard on your clothing and equipment. I take great care of my gear and use it until it is absolutely dead. Seriously, my favorite top from Patagonia (the R1 Pullover) is still kicking after six years, but I'm wearing it around with holes in the elbows. My friends are probably embarrassed to hang out with me in public.
The holes have gotten worse since this photo was taken, I will probably patch them.....
While I take great care of my gear, and sometimes spend hours repairing it, sometimes its just time to let go. Zippers corrode, crotches rip, straps break. The worst part is replacing it. If that item is even still available, it is probably expensive. I suppose the term expensive is relative, but $200 to me is a lot of money. That top in the photo retails at $120. Ouch. My trail sneakers are around $100. Everything adds up so quickly. I've decided to create a guide to getting pro-deals. Keep reading to learn how.

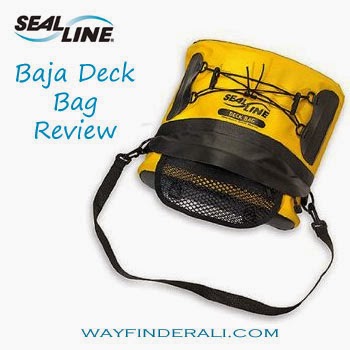
Review: SealLine Baja Deck bag for expedition sea kayaking

A deck bag is crucial for long days on the water. It provides quick and easy access to things like phones, sunscreen, hats, snacks and Gatorade pouches.
I've used a few different deck bags over the years so my requirements evolved to be very specific.

What to look for in a good deck bag for sea kayaking:

  • Made from durable waterproof material
  • Rigid structure to make it easy for me to dig around in it single handed
  • Fast and easy to open- I don't want a deck bag with a roll top closure that takes forever to open and close
  • Fast to take on and off my boat
  • Low profile to reduce wind resistance
  • Small enough to safely put in my lap under my spray-skirt in high winds without hindering my ability to wet exit
  • Splash proof
  • Dlastic d-rings to attach a strap so I can easily carry the bag on my shoulder. When I get to Ocracoke I use my deck bag like a purse- which gets me lots of strange looks.


So far my all-time favorite deck bag is the Baja Deck Bag from SealLine.


What I Love 
Size & Storage
  • Perfect Size- It is big enough to hold what I need it to, but not so big that wind resistance is a problem. It is small enough to keep in my lap under my spray skirt in extremely high winds. It has a stiff plastic insert that keeps the upper side of the bag in a curve shape which keeps the bag from collapsing and makes it easy to find your stuff. 
  • Zippered Access- There is a zipper to get into the main part of the bag- which in the above photo is covered by a rubber flap to make the zipper more water resistant. There is an outer mesh pouch that I use to keep my chapstick and other random bits in. 

Attachment Points
  • Straps to Rigging- The bag itself attaches to the deck rigging with two tough strips of rubber lined with velcro with two plastic buckles at the end. Un-clip the buckles, pull apart the velcro, and slide the straps under your deck rigging then clip to secure. I find it easy and quick to put on and take off this deck bag. I have used other bags that attach in different ways and this method is my favorite. 
  • Bungee- I use the bungee on top to hold my map and hat sometimes. The clips on the bungee are made to be a fast and easy paddle holder. I've only used them to hold my paddle a couple of times- it worked but I didn't feel like it was that secure. 
  • Carry Strap- The removable strap is the perfect length to throw over my shoulder- making it easy to carry my bag to my tent or around Ocracoke as a handbag.

So far so good. It seems like the perfect bag- and it is. Except for one major flaw. 

     The zipper sliders are metal. Why is that a problem? This is a bag for sea kayaking- in the ocean. When exposed to salt water they corrode. And no longer open or close. So you either end up with a bag that is stuck open or a bag that's stuck closed. Neither is good. 
      These are also our deck bags of choice for our sea kayaking guides at Pamlico Sea Base. We have four of them that our guides use all summer. In order to keep them working, the zippers have to be sprayed with silicone lubricant at the end of every trip. This is obviously annoying. 
      After sitting idle from August to May during our off season, they are stored in a closet in our boat shed. The boat shed is three sided, so although the deck bags don't get rained on, they aren't protected from the humidity in the air. After 9 months sitting idle, none of the zippers work. They are stuck closed. 
So until they fix this massive error, I can't say that the Baja Deck Bag is the perfect deck bag, but it's the best I've used so far. 

Pimp your PFD - Personalize your Kayaking PFD

Your PFD is your personal flotation device, so you should make it just that; personal!

PFD life jacket safety accessories
What the Law Requires
All kayakers are required to have a PFD by law. There are a few other items the Coast Guard requires us to carry to be legal. These include:


  • a sound producing device
  • a signaling device
  • a visual distress signal
  • a navigational light


  • Meeting Those Requirements 
    The law doesn't provide definitions for these items and doesn't direct the paddler on where they should be stored. There is definitely room for creativity. Here are a few options to fulfill those Coast Guard requirements:


  • sound producing devices: whistles, air horns, conch shells
  • signaling device: SPOT GPS device, cell phone, VHF radio, lights, flags, paddles, mirrors, flares
  • visual distress signal: flags, paddles, mirrors, flares
  • navigational light: deck light, headlamp, flashlight

  • What I Carry, Where I Carry It and Why
     
    So where should you store all that stuff? In a dry bag in a hatch? In a deck bag? On your PFD? Here is where I keep it all... I have all of these things, either in my kayak or on my body. Here is what I carry:

    In my PFD

  • Rescue Howler Whistle
  • Floating Signaling Mirror
  • Petzl E+Lite Headlamp
  • NRS Co-Pilot Rescue Knife
  • lip balm
  • Sunscreen
  • Cliff Bar
  • On the Deck

  • Baja Deck Bag
  • VHF Radio
  • Deck Compass
  • Big sunscreen
  • iPhone in a Lifeproof case
  • Rehydration salts
  • Spare paddle
  • Bilge Pump
  • Paddle Float
  • In my Pelican Box

  • 1 glowstick per kayak
  • Air horn
  • Flares
  • Spare batteries
  • Emergency phone numbers
  • GPS
  • Map
  • Compass

  • In emergency situations, having these easily accessible can mean the difference between life and death. They should never be stored in a hatch, where they are very hard to get to. In a worst-case scenario, the paddler is a swimmer without a kayak. In this scenario, it is important that the paddler (now swimmer) has the essential equipment to survive. I don't keep my VHF radio on my PFD because I know that the conditions I paddle in are unlikely to separate me from my boat. If you are paddling alone or in rough water, you absolutely should have your VHF attached to you.

    You should equip your PFD with essentials based on where, when and what you will be paddling. Keeping a marine radio on your life jacket while paddling a quiet cypress swamp is overkill. Keeping it on your PFD while paddling in open ocean is definitely not. When in doubt, over-prepare. Many guides in colder environments keep emergency blankets in their PFDs. Some guides even tether a dry bag with fire making materials and extra clothes to themselves!
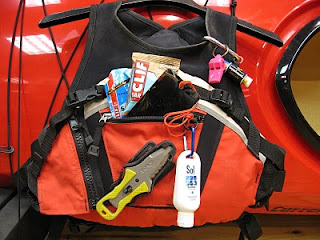

    life jacket safety accessories PFDAttaching things to your PFD
    This is where things get tricky.  It can be hard to get all of this stuff to fit, especially if your PFD has only a pocket or two, like mine. There are ways around this. One of them is the carabiner trick seen below. Don't be afraid to add knife attachment points or clips to your PFD, just make sure you mess with the flotation and make sure your modifications won't get you tangled or caught on anything. It is also very important not to overload your jacket with too much stuff. Your PFD is meant to keep you afloat. Do not sacrifice crucial buoyancy for unnecessary equipment.


    A carabiner on the shoulder strap can be a great way to hang  your whistle and lip balm. I know many male guides who do this. This trick works great for people with broad chests, but I found that the carabiner rubbed against my arm when I paddled.  I replaced the carabiner with a loop of 1/4" bungee cord.
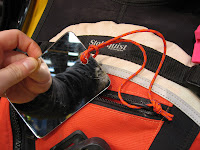

    sea kayaking life jacket PFD signaling mirror
     I keep my mirror on a lanyard. If it's so bad that I'm using a mirror, it's bad enough for me to loose it if it isn't tied to me.
    I often keep a cliff bar or cliff shot in there too, for fast fuel. I have to take any snacks out every night so mice don't chew into my PFD. Raccoons will steal life jackets out of kayaks if we leave granola bars in them.
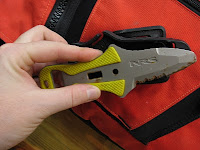

    PFD life jacket rescue knife co-pilot NRSMy knife is the NRS Co-Pilot Rescue Knife. I use it to cut birds and turtles free from nets, cut anyone who gets tangled in anything free, and to spread Nutella on my bagel at breakfast. Having a rescue knife with a blunt tip is crucial. Never attempt to free anyone with a pointed blade. It often ends in tragedy. Consider using bungee to connect your knife to your PFD to avoid dropping it during rescues.

    Trick it out for Comfort and Safety
    Be Seen
    If your PFD doesn't have any reflective strips on it, adding reflective strips to the shoulders is a must for better visibility. Reflective strips for PFDs are available from:


    Stay Hydrated
    With a hydration bladder, you won't have to sacrifice your pace and rhythm to stay hydrated. The NRS PFD Hydration Pack straps to most PFDs and can be worn as a backpack when off the water. Kokatat also makes the Tributary Hydration Bladder but it will not fit many of the PFDs on the market.


    Storage Solutions
    If you just can't fit everything onto your favorite PFD, there are several solutions. Kokatat has a variety of options that strap to Kokatak brand PFDs, that may also work with other brands.

    The Tactic Pack straps to the back of a PFD, has room for a hydration bladder and a VHF radio, and cleverly unclips to allow the wearer to access those items while paddling.

    The Belly Pocket attaches to many PFDs with front adjustment straps and keeps important items handy.


    Did you find this post helpful? Do you enjoy reading this blog? Help me keep it going by buying me a 'coffee'





    Sea Kayaking clothes for Warm Weather

    Going sea kayaking but not sure what to wear? 

    what to wear sea kayakingI've spent four summers guiding expedition sea kayaking treks, and over those many hundreds of miles, I've tested lots of clothing options and found what works the best, and what to avoid.

    sea kayaking outfit paddling clothes
    Me in what has become my sea kayaking "uniform"


    During these trips, I learned what was essential, what was a luxury, and what just got in the way. I took just the basics, although I sacrificed extra clothing for a few creature comforts. I wear the same outfit every single day. The only changes in clothing were due to changes in weather. If I got chilly, I put on pants and a very light jacket. If it rained, I put on a rain jacket. Otherwise, I wore my long sleeve shirt and quick dry shorts every single day. I brought one change of clothes I kept clean to change into at the very end of the trip.

    I tell my groups to get used to my outfit because it wouldn't change all week. They reacted by telling me how gross it was that I wore the same thing for 5 days. Your clothes will get dirty and smelly no matter if you wear them for one day or 5 days. If you're a bit muddy or your shirt starts to smell, you can always go for a dip in the ocean! Why bring extras when they're taking up valuable space for other things?

    Essential Clothing
    sea kayaking outfit
    George wearing a Columbia Tamiami II shirt and
    quick dry zip-off pants
    • Long sleeve, button up, quick dry shirt (no rash-guards!!)
    • 1 pair quick dry shorts + 1 pair quick dry long pants
    OR
    • 1 pair of zip-off convertible quick dry pants
    • Rain jacket
    • Wide brimmed hat, that floats, with a string
    • Water shoes or sandals (I recommend: Keens, Vibram 5 Fingers, Chacos)
    • Bandana or buff
    Optional Clothing
    • Swimsuit (note, your swimsuit will dry much more slowly than you quick dry clothes. I swim in my everyday clothes)
    • Rain pants (really only needed for when it rains while you aren't paddling, I never bring any- it's usually so warm I dry pretty quickly anyway)
    • Paddling gloves (may be good if you don't paddle much, I haven't used them)
    • Underwear (I don't wear any during my treks. just another layer of clothing to get and stay wet) if you bring any, make sure it dries fast
    • Light jacket if you're cold-natured

    Specific Items I wear:
    My Paddling Clothes