
Pages

▼
Drop Down MenusCSS Drop Down MenuPure CSS Dropdown Menu

How to Fix a Roto-molded Plastic Kayak with a Hole in it


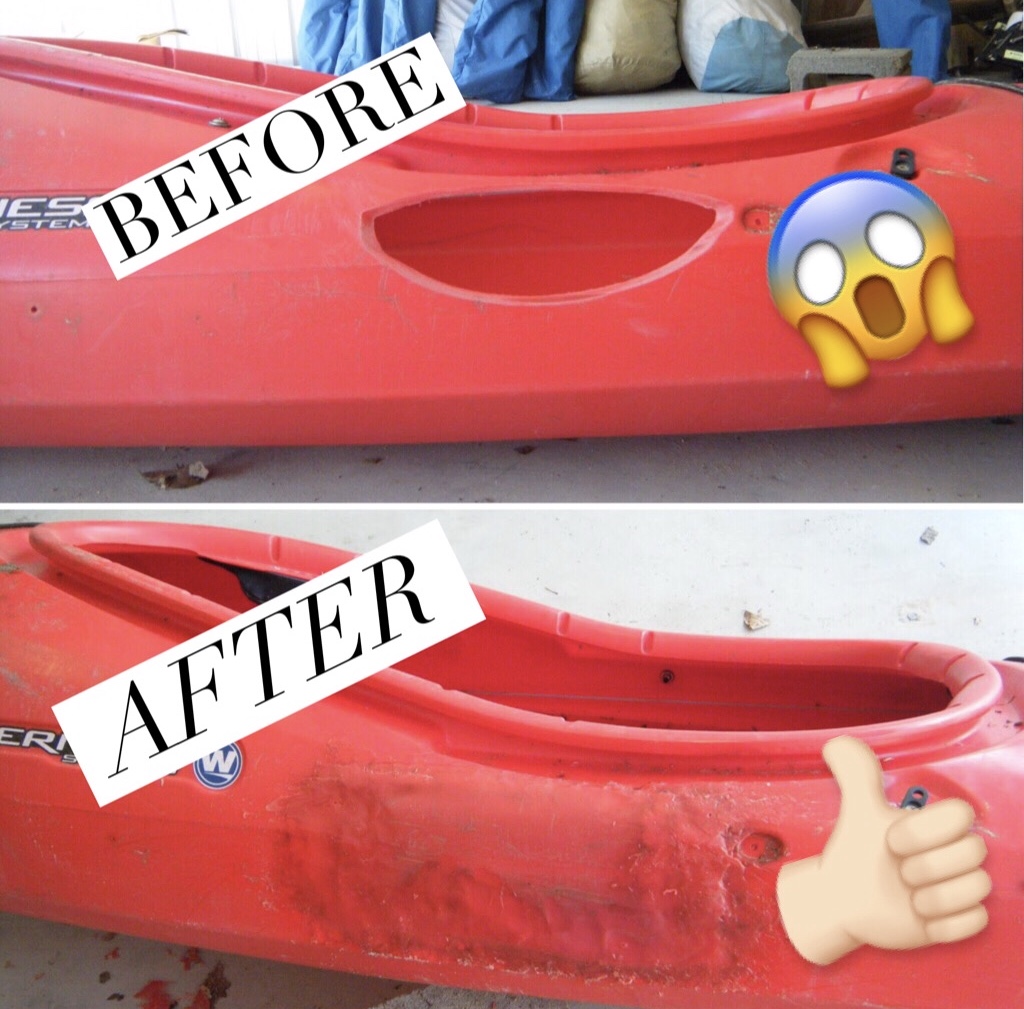
While working as a sea kayaking guide, I had to repair some enormous holes in plastic kayaks. One of our trailers was built for canoes and didn't have fenders over the tires. Unfortunately someone wasn't paying attention when loading it with kayaks and the sides of a few boats sat on the tire for a 2 hour trip. We had 3 boats with gaping holes in them.

It isn't very likely that you'll have a kayak with such a large hole, but whatever the size, here's how to fix it.


What you need:

  • Heavy duty gloves
  • Heat gun (propane blow torch works in a pinch)
  • Metal spoon / spatula
  • Patch (made from spare boat, 50 gallon plastic barrel, etc)
  • Water bottle for temperature regulation and safety
  • Safety glasses
  • Pliers
  • Clamp (depending on the type of repair)
  • Rough grit sandpaper
  • Well ventilated space

Prepping the kayak and the patch

If the hole is next to the seat or any rigging or anything that would either get in the way or catch fire, remove it. For the boat pictured, we had to take the seat out, take the paddle holder off, and move the rudder cable.

Sand the edges of the patch and the edges of the hole. I used a grinder for the patch to make things go faster. Some people will tell you to sand the side of the patch that will stick to the boat and the plastic of the boat around the hole the patch with attach to. I don't know if this helps the patch stick or not because I didn't bother doing it. It's probably worth trying.
Attaching the patch
This is truly the hardest part. I needed assistance because you have to move very quickly.
set up your work space so that everything is accessible.
  1. Put on your gloves
  2. Turn on the heat gun or ignite the torch
  3. With the pliers, hold the patch at a corner
  4. Using the torch/gun, melt the patch to the point that it is droopy but be careful not to burn a hole in it. Its easy to burn a hole through it with a torch. A little harder with the gun. I use slow sweeping motions across the body of the patch
  5. Sweep the torch across the outer edges of the hole enough so that the plastic starts to turn a different color. This boat turned yellow when it was ready, others turn white. be careful not to stay in one place for too long or you'll have two holes instead of one!
  6. You have to work EXTREMELY quickly, while both the patch and the boat are still hot. The patch needs to be pretty droopy and the boat sticky. you'll have to hold the patch in your hands and press it to the boat. Even with gloves on it gets hot!

Smoothing things out
Now that the patch is on, you need to make sure it'll stay on, hold water and look a bit better. This means you'll need to smooth things out. this part is really all about trial and error. It took me a good 15 minutes to get the technique down. Here's what to do.
  1. Get your torch and metal spoon or putty knife
  2. Frequently the edges of the patch won't be stuck to the boat even if the patch is staying stuck to the boat, I held the torch so that the flame went between the edge of the patch and the side of the boat until both turned yellow then I pressed them together using my gloved hand or the spoon.
  3. To smooth things out: heat up a small area (4 square inches) at the edge of the patch until it turns a color but not to the point that it catches on fire
  4. With small sweeping and frequent strokes, sweep the melted plastic of the patch out onto the sides of the boat. move quickly. as the plastic cools, or if you press too hard, the plastic with stick to the spoon. I would frequently wipe the hardened plastic off the back of the spoon using the cinder block
  5. It is best to heat up a small section and focus on it until you are satisfied with the smoothness and then move on. don't heat up a long section and try to work because it cools too quickly
  6. I turned the boat over and propped it up on a cinder block for better access to the bottom of the patch
Sand and check for leaks
Watertight but still needing sanding
Put the boat up on some saw horses if you have them and pour water into the cockpit. Watch for drops of water to come out of the patch. Work these areas over again with the torch.

Now if you want to, you can use the torch on the inside of the boat to transition the plastic of the boat to the patch. This time you're smoothing the plastic of the boat onto the patch. I think this step isn't very necessary unless your patch is leaking.

Now all you need to do is sand the patch smooth. 


What about repairs in the field?
The repair above is a reliable, secure and permanent repair, but requires lots of equipment you wouldn't have with you out on a trip. What do you do if you put a hole in your kayak while out on a trip? 

Triage paddler safety Keep the paddler safe by either landing or keeping the kayak afloat using a paddle float and improvised flotation made from dry bags filled with air. I always have two paddle floats and an empty dry bag with me on my trips.

Choose repair method Both JB Water Weld and Flex Tape will work underwater. Flex Tape is a great general purpose option, and best for larger holes. JB Water Weld works well for punctures and in places where curvature of the boat won't work as well with Flex Tape. Flex Tape won't work on plastic kayaks that have a dimpled or textured surface.


Pitch Your Tent Like a Pro

Take the Right Tent
A tent in the wrong environment spells misery, no matter how well you set it up! 
  • High winds: (beach, mountain-top, plains) Take a low profile dome or pyramid. The lower the better! If you're camping on the beach, take a tent that's shorter than the dunes. 
  • Hot and humid: Two wall tent with as much mesh as possible means better ventilation. Go as big as you can get away with- a bigger tent won't get as hot.
  • Cold and dry: Single wall tents are warmer and more wind-resistant. Get the smallest one you fit in, because your body heat will keep a smaller tent warmer. 
  • Raining cats and dogs: Make sure your rain fly covers the tent entirely and reaches all the way down to the ground. A vestibule (a covered 'porch' area under the rain fly) is a gear saver in wet weather.
Follow the Video for the Perfect Pitch
Can't watch the video? Keep reading...


Pack Before you Go
Unpack, and then re-pack
  1. Unpack: and separate the tent, poles, rain fly, footprint and stakes
  2. Stuff don't roll: stuffing protects the waterproof coating on your tent and rain fly
  3. Stuff in opposite order: rain fly at the bottom, poles on the side, then tent, then footprint, then stakes
Use the Right Tools
Buffy chose the right stake for killing vampires.
You should pick the right stake for your campsite
The stakes are high.....
See what I did there?! But seriously, you need the correct type of stakes for the environment you're camping in. Those cheap aluminum stakes your tent came with? Leave them at home.
Forests and general use: MSR Groundhog Tent Stakes are super strong and won't bend when you hammer them, and resist being pulled out due to their design
Sand: 12" Sand Stakes because bigger is better


Set-up in this order
  1. Stake it first: Stake out the footprint and tent, with the narrow side into the wind. Stake down the windward side first. 
  2. Poles: Set up the poles and connect the tent to the poles
  3. Rain fly: Put the rain-fly on the tent and connect it. Connect the windward side first.  
  4. Guy lines and vestibules: Stake out all the guy lines and vestibules to make your tent strong against the wind, and to keep the rain fly tighter. A tight rain-fly will shed water and is less likely to leak. 
Did you find this post helpful? If you did, consider supporting me by buying me a coffee here:

Buy Me A Coffee


Exciting News for Outdoorsy DIY-ers and MYOG

Does your favorite piece of gear have a hole in it, and you just can't find fabric to match it for repair? Or maybe you have a new design for a pack, but want to use two types of fabrics and need them in the same shade.

Now you can get the fabric you need in any color or pattern you want. Ripstop by the Roll just debuted 9 outdoor fabrics that can be printed on demand in over 1,000 colors AND whatever pattern you upload. I don't know about you, but my creative gears just started spinning!


If you need to match pre-existing gear or want to see what each color looks like on the fabric you'll use, you can order color swatches containing all 1300 colors. You can also custom print your own patterned fabric- in custom camo, your favorite galaxy print, a map of a beloved trail....the possibilities are endless.


To get the best results in pattern printing, I suggest designing or purchasing what is called a "seamless" pattern. This means that the pattern can be repeated like tile- laid end to end horizontally and vertically, and appear seamless.

Here is a youtube video that will show you how to make a seamless pattern:

Happy creating!

DIY Outdoor Gear Resources to MYOG


MYOG DIY outdoor gear making resources

I love making things myself. I've always dreamed of having my own outdoor brand- not a very feasible business idea that I would probably end up hating in the long run. With all the technical fabrics available online, we are no longer bound to the products made by big outdoor brands. You'll find fabric, patterns and tutorials online for everything from backpacks to tents to sleeping bags and rain jackets. I've put together the resources I go to when I have a project. If you know of any that I haven't listed, please mention them in the comments.


Forums
HammockForums.net This forum is the go-to spot for hammock camping tricks. There is a forum for all things DIY, just don't post with tent making questions as it is a hammock camping only forum.

WhiteBlaze.net This is a community of Appalachian Trail enthusiasts with TONS of info on the AT- you can get answers to all your AT questions. There is also a forum on here for DIY gear.

BackpackingLight has forums dedicated to a variety of topics including a MYOG Forum (make your own gear) To post to the forum you must have a basic membership to the site which costs $5 a year

Backpacking.net has a little corner of their website dedicated to a MYOG forum. 

MYOG on Reddit - A fantastic forum full of resources, projects and advice

DIY 20°F Ultralight Backpacking Quilt Part 4-
Final Touches and Thoughts

Final Touches

Installing the Cord / Bungee

  • Cut your cord or bungee at least 6 inches longer than the length of your casing. This will make it easier to tie knots in once it is in place. 
  • Use some wire (I used a paper clip) to create a hook that will enable you to feed your cord through the casing
  • I used glow in the dark paracord because I had a bunch laying around. To reduce bulk and weight, I removed the core strands. 

My hook made from a paperclip
Drawcord with mini-cord locks installed


DIY 20°F Ultralight Backpacking Quilt Part 3 - Pinning and Sewing


Stacking and Pinning

If you are using thick insulation like I am, you will definitely need 'quilting' length straight pins. Using regular length pins will not work. I bought 1 3/4" pins for 7.5oz Climashield and it worked. If I had 10oz I would need longer pins. 
  • Pin your Shell and Liner fabric with right sides together. If your fabric has a side that is more shiny, that is the 'wrong' side
  • Sandwich the straps or draft flaps between the shell and liner, with the end of the strap/flap you want to be on the outside edge of your quilt pointing toward the center line of the quilt
  • After you've pinned the shell and liner to each other, pin the insulation on the bottom to them. The insulation will run against the feed dogs of your sewing machine


DIY 20°F Backpacking Quilt Part 2- Marking and Cutting

What you need to mark and cut

  • Weller Woodburner or a hot knife. Any nylon fabric needs to be cut with heat so that the edges are sealed and will not unravel. Even capturing the edge with a french seam only delays unraveling. 
  • Some sort of heat-resistant material to put under your shell and liner fabrics- either a piece of wood, metal or glass. A few people online have used scissors to cut the fabric and then sealed the edge with a lighter, but they say it is extremely easy to accidentally melt too much fabric.
  • Good Sharp Fabric Scissors at least 9" long if you are working with thick insulation like I am. If your insulation is thinner, smaller scissors will work. Just make sure they're sharp. 
  • Permanent fine tip marker
  • Tailors chalk

DIY 20°F Ultralight Backpacking Quilt for $100 Part One

Why a Quilt?

This is what I already have-
The fitted sheet and tech blanket by
Thermarest
I chose to use a quilt for my sleep system this summer for several reasons:
  1. The insulation underneath you in a sleeping bag gets so compressed that hardly provides any insulation
  2. Quilts weigh less
  3. I toss and turn at night and sleep on my stomach, back and side. Mummy bags annoy me. 
  4. I already have the Thermarest sleep system which consists of a fitted sheet for my sleeping pad and a very lightweight tech blanket that snaps to it. I plan to use my fitted sheet with my DIY cold weather quilt. 
  5. I couldn't afford a high quality 20°F mummy bag that weighed a reasonable amount. 
Why bother making it myself?
  1. I have read online that people with no sewing experience have been very successful making these. I have a good amount of sewing experience so I hope it will be easier for me.
  2. The wait time to get a quilt from a manufacturer is up to 8 weeks and I didn't have that long to wait. 
  3. I saved $80 by making it myself
  4. I get to make my blanket in the colors I want and with all the details I want

Design and Dimensions

My quilt design is based on the Prodigy Quilt by Enlightened Equipment.
I think the Prodigy is a good product at a reasonable price ($180), but I really needed to save the $80 and make it myself. I also wanted specific colors and a specific kind of liner fabric. 
I picked this design for several reasons:
Prodigy Quilt by
Enlightened Equipment
  1. A casing (sewn channel of fabric) at the shoulders and foot with a bungee cord inside make it easy to create a foot box and cinch the quilt around the shoulders, eliminating heat loss.
  2. The simplicity of the design lends itself to ease of construction- it is a simple polygon without a hood, pockets or sewn channels
  3. The Enlightened Equipment website provides the exact dimensions for quilts to fit different sized people which eliminated the guesswork of figuring out how long and wide my quilt needed to be in order to be comfortable for my size. Here is a link to their Quilt Sizing page which has all the details.
I used the specs for the Short length, Narrow Width quilt which is for little people up to 5'6" who sleep on their backs or toss and turn at night. The finished specs for it are as follows:
Basic Specs:
Total length: 72"
Top half width- 50"
Tapers to 38 " at the foot box.
Insulation- 7.5 ounce Climashield (synthetic insulation)

Weight- 29.65 ounces

I chose to make my quilt go to 20°F because I tend to be a very cold sleeper. Here is a chart to help you choose which weight Climashield you should use:
2.5 oz - 50°F $7.00/yd
3.6 oz - 40°F $9.00/yd
5.0 oz - 30°F $10.95/yd
6.0 oz- 20°F $14.00/yd (only available from DutchWare Gear)
7.5 oz - 10°F $16.95/yd
10 oz - 0°F $23.50/yd
Materials List:
Total Cost: $96 with shipping

Tools and necessities:
  • Sewing Machine with walking foot
  • Quilting Straight pins at least 1 3/4" long
  • Hot knife / Woodburner with blade tip or scissors and lighter for cutting nylon
  • Lighter for sealing cut ends of bungee and elastic
  • Measuring tape
  • Yardstick or long straight edge
  • Square
  • Tailors chalk
  • Dumbell weights to hold materials down
Connection Options
Many quilts including those from Enlightened Equipment and Thermarest have systems to connect the quilt to the sleeping pad. This keeps the quilt from moving around when you toss and turn. 
The Enlightened Equipment
quilt strap system

The Enlightened Equipment system uses small clips along the sides of the quilt that correspond with clips on pieces of elastic that fit around the sleeping pad. This enables the user to snug the quilt up tightly around the body in cold weather. This system would be easy to integrate into a DIY quilt. Here is a link to a detailed description of how that system works.

Thermarest Loops and Snaps
Thermarest uses a system for their quilts which is much simpler than Enlightened Equipment but it doesn't give the user the ability to snug the quilt up around the body. This system uses small loops on the sleeping pad or sheet and little straps with snaps on the quilt itself. This system would be easier to incorporate into a DIY quilt and easily fixed if a snap broke.  


Someone on the Hammock Forums mentioned adding 'draft stoppers' to the edges of
Ray Way finished quilt
The darker blue fabric on the edges
 is the draft stopper 
the quilt. These draft stoppers are just single layers of 6" wide shell fabric sewn to the edges of the quilt. They eliminate any drafts that might occur from a gap between the quilt and the sleeping pad / ground. I did a bit of research and found that the 
Ray Way Quilt Kit uses this design. The image to the right shows a Ray Way quilt turned upside-down so you can see the draft stopper edges. 


Did you find this post helpful? Do you enjoy reading this blog? Help me keep it going by buying me a 'coffee'


Ready to get started? Click HERE for Part Two


Super Easy DIY Travel Deodorant

DIY Tiny Custom Deodorant
DIY travel deodorant
I am so picky when it comes to deodorant, and have never found my favorite kind abroad. I typically travel with a full size tube when I'll be gone for a long time, but this technique is better for shorter trips. It's also a great way to customize the scent of your deodorant. Just buy an unscented stick and add your own essential oils or fragrance for a custom scent. Want to eliminate chemicals from your deodorant? Check out this chemical-free recipe from Scratch Mommy.


Supplies:


  • Solid deodorant
  • An empty deodorant tube 
  • Knife
  • Microwave
  • Small glass bowl
  • Sink and paper towels
  • Optional fragrance


  • Instructable: Super light spice kit! (1oz)

    Let me introduce you to one of my all time favorite websites- Instructables! I love this site because I've found so many great "outdoorsy" DIY projects.

    Instructables is a website where thousands of people create and post tutorials. You can find everything from jewelry making, art, design, camping, gear, bike repair, computer repair and all sorts of things! There is even an instructable teaching you how to convert a gas powered motorcycle to electric. If you want to learn how to do something, or need some creative gift ideas, this is the place to go.

    This super-light spice kit is one of my favorites. I plan to make one very soon to use during my treks next summer.
     1oz Ultralight Backpacking Spice Kit