Pages

Drop Down MenusCSS Drop Down MenuPure CSS Dropdown Menu

Rogue Themed Survival Kit Load Out

What would be in a Rogue's survival kit? We know the aesthetic- dark, mysterious, a bit violent, definitely chaotic. They're known for scaling buildings, hiding in dark corners and general sneaking about- so I included a riggers belt and a locking carabiner in this kit- things I don't normally consider in the top 5 survival items. 


A pouch to carry the kit, in black multicam, naturally
Steel water bottle - uninsulated so you can use it to boil water, and a sturdy handle 
Tiny, functional, deadly neck knife from CRKT
Riggers belt for getting out of tricky situations fast
Matte black locking carabiner for aerial stealth
The most aesthetic titanium whistle
Burly ferro rod by UCCO because fire = life
and finally an obsidian arrowhead for luck


Aragorn Themed Survival Kit

I absolutely love the idea of themed mystery boxes- and would LOVE to create themed survival kits for people, but unfortunately I don't have a warehouse full of survival gear to put together kits for, nor the money to create such an inventory. So I'm doing the next best thing and curating the kits digitally. 

Here is the first in the series- this one is for a Ranger of Middle Earth:


Contents:
NRS Cowtown Ranch Knife

Getting into Camping on the cheap: The basics you need to know


In this collapsing capitalist hellscape, getting time in the wild is so critical to our mental and physical health. But since we need to follow Leave No Trace, and can't just build a shelter wherever we camp, unfortunately we have to spend money to go camping.

In an ideal world, we would borrow what we don't have, buy used what we can't borrow and our last resort should be buying new. Scarcity has us all in a choke hold, and it can be difficult to convince a friend to let us borrow the tent they shelled out their bonus on. 

Buying used: DO NOT buy a used tent unless you can be guaranteed it was stored in a climate controlled space (not the attic or garage) Otherwise it is essentially useless. The waterproofing disintegrates in high heat. I would only consider buying a used tent from a friend who I know cared for it well, or that I could inspect thoroughly. ANY stickiness on the floor or rainfly is indicative of improper storage.  DO NOT buy a sleeping bag unless you are guaranteed it was stored loosely (not in it's stuff sack) and if it was down, that it was laundered properly with soap specifically made for down sleeping bags.  More info on buying used HERE

Tents


Things to look for:
 

  • aluminum poles (avoid fiberglass)
  • rain fly that goes all the way to the ground
  • as much mesh as possible in  the inner tent for breathability
  • no-see-um proof mesh
  • below 45" height for beach camping, or anywhere that experiences high winds (like the desert and plains)
  • Free standing tents (like dome tents) are WAY easier for beginners to set up, and more forgiving in environments with really hard surfaces like rock
  • The more vertical the sides of the tent, the roomier it will feel with the same floor space


For car camping and kayak/canoe camping I love the REI Half Dome 2, but it's over $300, way out of many budgets. It has all the above features, so go take a look at it to get an idea of what I'm talking about. 

ALPS mountaineering Felis 4 roomier simple tent for drive-in camping. Taller than backpacking tent, but still short enough for beach camping

Nature Hike Mongar 2 person tent Super budget tent with great reviews

Nature Hike Cloud Up 2 tent- inexpensive but still quality tent, small and light enough for backpacking (a friend of mine just got this one)

Tent Set-up and Care

Don't fold and roll your tent! Check out this post + video for the fastest, cleanest and most secure way to set up your tent: HERE

Store your tent in a climate controlled space! Don't put it in the attic or in your garage or it'll be ruined in a year!

A word about tarps.....

I love a tarp. I actually sleep under a tarp when I backpack instead of bringing a tent, but it takes some skill to set up in a range of situations.  This is my tarp set up on a windy night while leading a backpacking trip in Roan Highlands in 2024. If you're in an area without a lot of bugs and you're good at tarp rigging you can avoid buying a tent altogether. 

I also ALWAYS bring a spare tarp on camping/backpacking trips with friends in case there is bad weather. You can't cook in your tent, so it is nice to be able to create an area outside of your tent that you can cook and hang out in on rainy days. I definitely recommend buying an inexpensive tarp, some rope, and practicing the bowline and taught line hitch with your tarp before your trip. 


I teach a tarp rigging class in Raleigh, NC through my company, Wayfinder Outdors: Tarps + Shelters Class

Notes on tent stakes...

Do yourself a favor and get tent stakes for the type of ground you'll be camping on. The hook shaped aluminum stakes your tent likely came with are AWFUL. If you are camping at the beach or in the desert, please please invest in sand stakes like these. I've tried lots of sand stakes, and those are the only ones that work. For other conditions (like normal forests) I recommend the MSR Groundhog stakes, or these knockoffs that work just as well for a fraction of the cost.  

Sleeping pads

A sleeping pad is CRITICAL. Insulation works by trapping air within the material and slowing the transfer of heat. When you lay in your sleeping bag, the insulation under your body is flattened, thus removing all ability to slow or stop heat transfer. You will get cold in a sleeping bag without a sleeping pad. Plus, sleeping on the ground is not very comfortable and difficult for most people to get a good night's sleep. 

How sleeping pads work: Most camping and backpacking sleeping pads have some kind of insulated core, that is then held open by air. When the pad is deflated, the insulation has no air pockets and therefore does not work. Insulation types include foam, synthetic down and down. DO NOT buy a pad that is just an air mattress. 

R value is a measurement of insulating ability. Anything over 4 is generally safe for cool to cold conditions outside of really extreme cold like the arctic or mountaineering. 2-3 is for summer.

Self-inflating refers to pads where the core is foam. When you open the valve, the foam naturally expands, but my experience is that they still need a couple of breaths to be firm enough. These pads tend to be more comfy and usually a higher R value but are bulkier and heavier. I use them car camping and sea kayaking, but generally find them too bulky for backpacking. 

Non-Self Inflating: These have some kind of insulating material that is similar to what might be in an insulated jacket or sleeping bag, and usually often a layer of mylar to reflect heat. They can be comfortable, but sometimes have an 'air mattress' feel where they feel bouncy. Be VERY careful with these as the R values range widely from just air (no insulation, R value essentially 0) all the way up to 6. These are completely useless if they have a leak. The achilles heel of these pads are the glue that holds the pad together and the thin material that the pad is made of. If the glue fails, or the cover gets a leak, the pad is useless. Only buy from trusted brands or pads with great reviews. 

Super comfy, only for drive-in campsites: PineHike 4" Memory Foam Self Inflating Pad

REI Trailmade Sleepin Pad - middle of the road budget self inflating sleeping pad, comfy, good for range of conditions, still only around 2” thick

Nature hike Ultralight Insulated Sleeping Pad- 3” thick, high r value backpacking sleeping pad. More delicate than self inflating pads, but packs smaller and lighter. I personally bought this one recently. 

Least expensive, lightest, also least comfortable, only for warm conditions: Thermarest Z-Lite sleeping pad I have this one, and I've slept on it. If you are not accustomed to sleeping on a hard surface, this might take you a week to get used to, if you ever get used to it. Hard for side sleepers. A great option for additional insulation and protection under another pad during the winter. 

Sleeping bags

Insulation: Sleeping bags are filled with one of two types of insulation: down or synthetic. There are advantages and disadvantages to both. Assume we make 2 of the EXACT same dimension sleeping bag, but one is insulated with down and the other synthetic. The down bag will usually weigh less and pack smaller, but cost more, and be less insulating if the bag gets damp. The synthetic bag will weigh more, not pack down as small, but will keep more of its ability to insulate if it gets damp, and will cost less. 

More on Down: Not all down is created equal. Down is rated by its ability to fill a certain volume. The higher quality down takes less down to fill a specific amount of space, so a bag made from that down will weigh less while being just as warm. This is described as fill power. The higher the number, the higher the quality down. The highest I have seen is 900 fill power, and the lowest is 600. Two sleeping bags made to the exact same dimensions where one is filled with 900 fill power and the other with 600, the 900 fill power bag will weigh less, pack smaller and be more expensive. It is not unusual for me to see a 600 fill power bag  for 20 degree weather that weighs more than its synthetic counterpart...which leads us to synthetic.

Caring for down: Down is essentially a bunch of feathers that are stuffed into sewn channels in the bag that are called baffles. It is really important that if you need to wash your bag, you do it properly. Water and detergent makes down stick together and can ruin your bag, so it is important to wash your bag in a front loading machine with non-detergent soap made specifically for down. ALL sleeping bags should be stored loosely and not compressed, away from high heat and humidity. 

Synthetic Insulation: Not all synthetic insulation is created equal. Some companies have their own proprietary synthetic insulation that is quite incredible (Marmot for example) and others make what is cheap but works- and is usually bulkier or heavier. Some companies decide to avoid making their own insulation entirely and use brand name insulation like Primaloft or Climashield. 

Caring for synthetic:  All sleeping bags should be stored un-compressed in a place protected from high heat and humidity. Many synthetic bags can be washed in a front-loader with normal detergent but not all, so it is important to check the label on the bag or contact the manufacturer. 

Shape: Mummy bags pack down smaller and are lighter, less comfy, but better for cold weather. They do a better job at holding in heat while weighing less. Rectangular bags are more comfortable, but require more fill weight (more insulation) to achieve the same temperature as a mummy bag because our body has to work to heat up the empty space inside the bag. So, they are heavier and bulkier, and not as warm at the same weight as a mummy bag. 

Stoves

Large car camping stove, cook real food, can use kitchen pots and pans: Coleman Triton 2 Burner Camp Stove

Ultralight backpacking stove - ultralight, only for boiling water for instant meals. Not very windproof

Evolved supply 750ml pot - my favorite pot, ultralight, for use on a stove or a fire

TOAKS Titanium pot with bail handle- if you have prime and don’t wanna pay for shipping for a titanium pot that you can use on a stove or a fire. This is similar to, but not as good as, the Evolved Supply pot

It's Sugar Plum Season!


Sugar plums, AKA American Persimmons are ready, right now, if you live in the south. Now is the time to go out and harvest them. I'm in North Carolina and have been harvesting for the last week. 

I love the taste but hate the texture of fresh persimmons, so I have figured out a few different ways to eat them to avoid that snotty texture. 

How to Harvest

I head over to a Persimmon tree armed with a large pot with a bail handle for easy carrying, a tarp and an arborists throw ball (get the 12 oz ball)

The ripe persimmons are SUPER squishy. If they're firm at all, they aren't ripe yet. You can split one open and put it to your tongue if you aren't sure. Less-than-ripe persimmons make your mouth pucker and get super dry. Trust me, it's REALLY obvious if it isn't ripe. 

First, I hunt around on the ground, stepping VERY carefully to find all the perfectly ripe persimmons that have just fallen that day. Once I'm satisfied I've gotten the good ones, I spread a tarp out and get out my throw ball. 

How to get more persimmons with an arborists throw ball:


Processing the Sugar Plums

If you have zero time for processing and want to eat them, but also hate the texture, just smash them onto your fruit trays in your dehydrator. I love THIS dehydrator because it has a timer- no more getting up in the middle of the night to turn off the machine. Smash them so that each persimmon is an even thickness. I just throw the dried whole fruits in a bag and eat around the seeds. 

You'll need a food mill or a blender with plastic dough blades to separate the pulp from the seeds. I use THIS food mill which is turned by hand. 

I do one of two things with the pulp-  I either freeze it to bake with later or I spread it on fruit trays in my dehydrator and make fruit leather. 

Here is a video tutorial:


Happy Harvesting!!

Pimp your PFD -What a kayaking guide puts in her PFD- a video update for 2025

Way back in 2010, I wrote this post on what I kept in my Stohlquist kitty PFD while leading sea kayaking expeditions. When I wrote that post, I had led around a thousand miles of trips. Now that mileage has grown significantly, and what I carry in my new Kokatat Hustle PFD has changed a little bit too. Here is a video update, and more info below the video if you would like to read more. 


Here is what is in my Kokatat Hustle PFD in the video:

Fox40 Micro Whistle - little and LOUD

NRS Co-Pilot Rescue Knife - the blunt-tipped knife with a quick release sheath designed to integrate into a PFD knife holder

Petzl E+Lite Ultra Compact Headlamp - the tiny waterproof headlamp that lives in my PFD so I always have a light

Black Diamond Storm 500 Lumen Headlamp - I carry this when I plan to be out in the dark. It is VERY bright

Petzl Djinn Bent Gate Carabiner - Totally rust-proof. The bent gate makes it smoother to use. 

My favorite reef-safe sunscreens:

Sky & Sol Mineral Tallow Sunscreen - the best sunscreen for your skin

Badger Mineral Sunscreen - clean ingredients, super effective sunscreen 

Blue Lizard Face Stick -this fits REALLY well in a PFD pocket

Badger SPF Lip Balm - clean ingredients

But what about your phone?

Because I paddle in salt water, I keep my phone in the Nite Ize Runoff Phone Case that allows me to still use it while keeping it safe. Unfortunately, in the bag it doesn't fit in my PFD, so I wear it around my neck, and tuck my phone between my body and my PFD 


What I'm adding in 2025


I've always kept my water bottle in my cockpit, which is awful when I'm in choppy conditions and wearing a spray skirt. Leaving my water on the deck of my boat means that it gets really hot in the sun. I've always hesitated to put a hydration bladder on my PFD, but this year I'll be leading 6 weeks of trips and I have decided to try it out. 

NRS makes the Swig PFD Hydration pack, which fits most of their PFDs, but I am unsure whether it will fit mine. I plan to order it and see if it fits. If it doesn't I guess I'll be making something myself. 

Triangle Mountain Biking Resources

I get asked this question SO much, so I decided to put all the info in one place for you. If you're a mountain biker who recently moved to the North Carolina Triangle or you already live here and new to riding, here's all the info you need for getting the most out of this area. 

We are lucky that we have a TON of places to go with a good bit of variation in terrain. 

Places to Ride

First, download a couple of apps dedicated to mountain biking. The two I use are Trail Forks and MTB Project. I usually prefer Trail Forks, but I have both because the data detail can vary between the apps. They are both free. 

Trail Forks

MTB Project

Here's a list of legal places to mountain bike within an hour of Raleigh:

  • Lake Crabtree - flowy beginner and intermediate trails, advanced loop, skills sections, jump area and pump track
  • Forest Ridge - very flowy and great for beginner and intermediate riders
  • San Lee - most people love it or hate it, located in Sanford. Lots of rock gardens and technical sections. It also has a gravity park
  • RTP - 4 miles of trail, flowy and fast. No amenities
  • New Light - pretty views along Falls Lake, difficult, black diamond trail
  • Beaver Dam- intermediate and advanced loops. $4 fee per car memorial day through labor day
  • Wake Forest Reservoir
  • Legend
  • Harris Lake - very flowy and great for beginner and intermediate riders, has a super fun flow trail
  • Briar Chapel - a few trails for beginners but mostly for intermediate and advanced riders. Lots of rock gardens
  • Brumley- Nice large preserve with a few rock gardens. Something for all levels of rider here
  • Carolina North Forest
  • Little River Park
  • Sarah Williamson Preserve
People to Ride with
Triangle Off-road Cyclists (TORC) This group leads trail rides, hosts events and does a TON of trail building and maintenance in the triangle. If you're looking for people to ride with or learn from, you'll want to join. You can find them on their website, Facebook and Meet-up.


Trail Status
Trails in the triangle are very susceptible to erosion and damage if ridden while wet, so expect closures during and after wet weather. Use Triangle MTB to check the status of a park before you head out. This website is updated by users and the status for each location shows when it was updated. If it was updated several days ago, it may be useful to call the park. 

If the park you want to go to hasn't been updated recently, try calling their main office. Typically their answering machine will tell you if trails are currently open or closed even outside of office hours. 

Know Before Your Go
  • Helmets are required in all managed parks. Most parks have fines for not wearing a helmet and/or will kick you out
  • Some parks have bike tools, bathrooms and other facilities (Forest Ridge and Crabtree, for example) and other parks have only a porta-potty or no facilities at all (RTP and Brumley for example) 
  • San Lee asks that all riders sign in at trail head. Proven trail use is how they keep their funding. 
  • Riding alone isn't the safest, but if you must, share your ride plan with a friend
  • Electric bikes are not allowed at some parks, so check with the park if you have one

My Favorite Paddling Shoes


Links to the shoes I talk about in the video:


(Vibrams no longer in production so no links here)


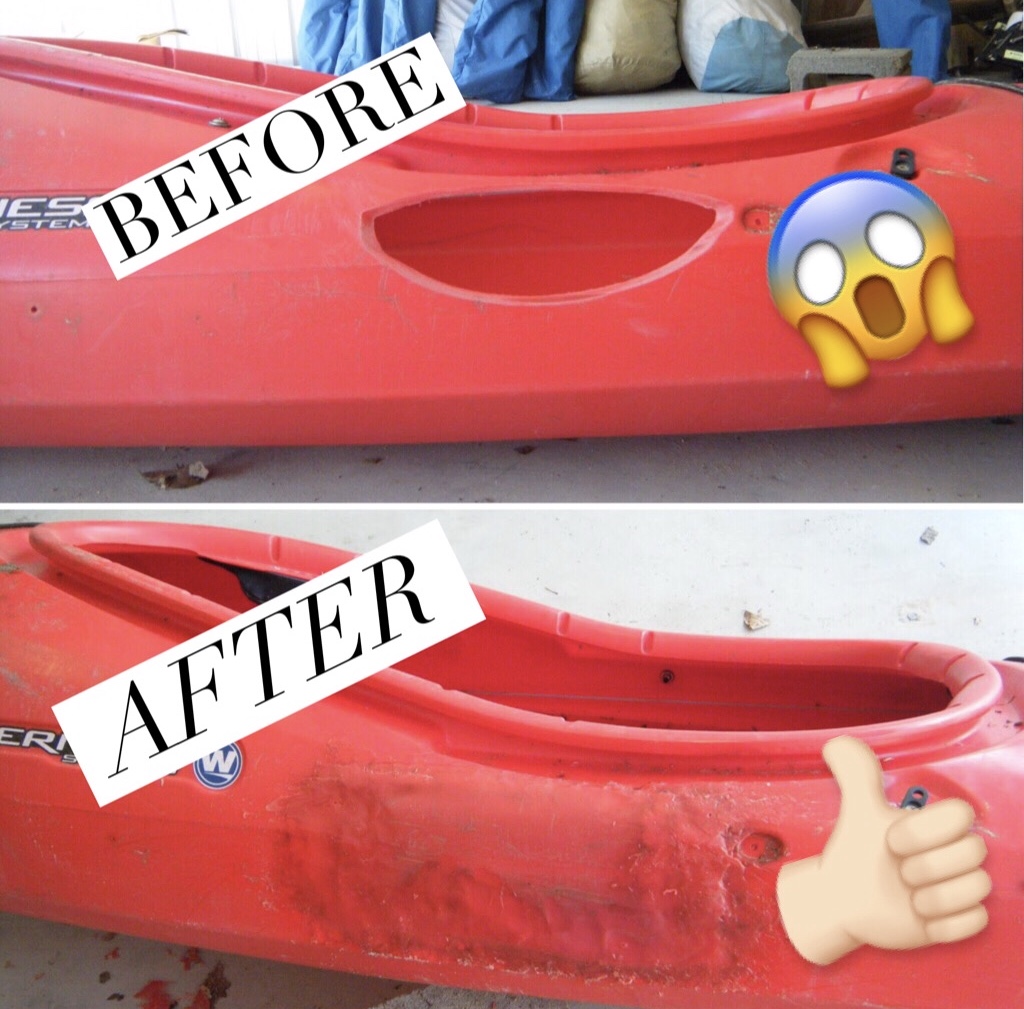
How to Fix a Roto-molded Plastic Kayak with a Hole in it


While working as a sea kayaking guide, I had to repair some enormous holes in plastic kayaks. One of our trailers was built for canoes and didn't have fenders over the tires. Unfortunately someone wasn't paying attention when loading it with kayaks and the sides of a few boats sat on the tire for a 2 hour trip. We had 3 boats with gaping holes in them.

It isn't very likely that you'll have a kayak with such a large hole, but whatever the size, here's how to fix it.


What you need:

  • Heavy duty gloves
  • Heat gun (propane blow torch works in a pinch)
  • Metal spoon / spatula
  • Patch (made from spare boat, 50 gallon plastic barrel, etc)
  • Water bottle for temperature regulation and safety
  • Safety glasses
  • Pliers
  • Clamp (depending on the type of repair)
  • Rough grit sandpaper
  • Well ventilated space

Prepping the kayak and the patch

If the hole is next to the seat or any rigging or anything that would either get in the way or catch fire, remove it. For the boat pictured, we had to take the seat out, take the paddle holder off, and move the rudder cable.

Sand the edges of the patch and the edges of the hole. I used a grinder for the patch to make things go faster. Some people will tell you to sand the side of the patch that will stick to the boat and the plastic of the boat around the hole the patch with attach to. I don't know if this helps the patch stick or not because I didn't bother doing it. It's probably worth trying.
Attaching the patch
This is truly the hardest part. I needed assistance because you have to move very quickly.
set up your work space so that everything is accessible.
  1. Put on your gloves
  2. Turn on the heat gun or ignite the torch
  3. With the pliers, hold the patch at a corner
  4. Using the torch/gun, melt the patch to the point that it is droopy but be careful not to burn a hole in it. Its easy to burn a hole through it with a torch. A little harder with the gun. I use slow sweeping motions across the body of the patch
  5. Sweep the torch across the outer edges of the hole enough so that the plastic starts to turn a different color. This boat turned yellow when it was ready, others turn white. be careful not to stay in one place for too long or you'll have two holes instead of one!
  6. You have to work EXTREMELY quickly, while both the patch and the boat are still hot. The patch needs to be pretty droopy and the boat sticky. you'll have to hold the patch in your hands and press it to the boat. Even with gloves on it gets hot!

Smoothing things out
Now that the patch is on, you need to make sure it'll stay on, hold water and look a bit better. This means you'll need to smooth things out. this part is really all about trial and error. It took me a good 15 minutes to get the technique down. Here's what to do.
  1. Get your torch and metal spoon or putty knife
  2. Frequently the edges of the patch won't be stuck to the boat even if the patch is staying stuck to the boat, I held the torch so that the flame went between the edge of the patch and the side of the boat until both turned yellow then I pressed them together using my gloved hand or the spoon.
  3. To smooth things out: heat up a small area (4 square inches) at the edge of the patch until it turns a color but not to the point that it catches on fire
  4. With small sweeping and frequent strokes, sweep the melted plastic of the patch out onto the sides of the boat. move quickly. as the plastic cools, or if you press too hard, the plastic with stick to the spoon. I would frequently wipe the hardened plastic off the back of the spoon using the cinder block
  5. It is best to heat up a small section and focus on it until you are satisfied with the smoothness and then move on. don't heat up a long section and try to work because it cools too quickly
  6. I turned the boat over and propped it up on a cinder block for better access to the bottom of the patch
Sand and check for leaks
Watertight but still needing sanding
Put the boat up on some saw horses if you have them and pour water into the cockpit. Watch for drops of water to come out of the patch. Work these areas over again with the torch.

Now if you want to, you can use the torch on the inside of the boat to transition the plastic of the boat to the patch. This time you're smoothing the plastic of the boat onto the patch. I think this step isn't very necessary unless your patch is leaking.

Now all you need to do is sand the patch smooth. 


What about repairs in the field?
The repair above is a reliable, secure and permanent repair, but requires lots of equipment you wouldn't have with you out on a trip. What do you do if you put a hole in your kayak while out on a trip? 

Triage paddler safety Keep the paddler safe by either landing or keeping the kayak afloat using a paddle float and improvised flotation made from dry bags filled with air. I always have two paddle floats and an empty dry bag with me on my trips.

Choose repair method Both JB Water Weld and Flex Tape will work underwater. Flex Tape is a great general purpose option, and best for larger holes. JB Water Weld works well for punctures and in places where curvature of the boat won't work as well with Flex Tape. Flex Tape won't work on plastic kayaks that have a dimpled or textured surface.


Cold Swimming for Mindfulness and Connection

From even before I can remember, I always felt the need to get in whatever body of water was nearby. As a toddler, my mother had to keep close watch whenever we were around water, because if she looked away, I was pulling my clothes off and running for the water. Water temperature and cleanliness never fazed me, at least not that I remember. I just remember needing to be in the water.

It is only in this last year, at 33 years old, am I beginning to understand the pull wild water has always had on me. For all my years spent paddling and exploring in waters all over the world, I never gave this connection much thought, I simply enjoyed it.

A little over a year ago I got super interested in this guy named Wim Hof, and all the cool things he could do just from breath training and cold exposure. As a chronically cold outdoor guide, I wanted to be a better outdoors-woman, and I wanted to be less miserable in the winter. My boyfriend Travis and I started taking cold showers (which I still hate) and swimming in cold bodies of water.

Cold, clean bodies of water are only available during a fraction of the year where we live, and even then are too far away for a daily or even weekly dip. We take opportunities for wild, cold swims whenever we can find them.

This New Years Eve we took just such an opportunity and jumped into the Atlantic at Folly Beach, much to the surprise and amusement of other beach goers who were bundled up against the cold wind. We stripped down to our swimsuits and wondered aloud to each other if we were crazy or just stupid.

Once we were all out there, in it together, something felt really special, and powerful, being in the cold ocean in our little tribe of four. Why is it that swimming in nature feels so magical? What is so special about cold water?

Within choice is where power resides

I hadn't noticed the difference in how he and I face full immersion until Travis pointed it out to me.
"You're always so calm and quiet."

He bounds into the water at nearly a run, slowing down as the cold digs in, until he methodically strides deeper and deeper. He whoops and hollers before plunging in head-first. I think he hypes himself up for it like a warrior yelling a war cry.

I, on the other hand, appear to be just the opposite. I walk slowly and purposefully into the cold. I'm not quite easing myself in, but rather allowing the cold to take over without such a shock to my senses. It feels more like acceptance. I pause in waist high water to breathe and think. It is here where I experience the strongest objections from within myself. Immersion will be shocking, uncomfortable- I dare say painful. It is so much easier to just stay as I am. But here is where choice resides. Here is where I have true power. I choose to have power over my actions, I choose to embrace challenge.

I think everyone's mind screams at us not to dive in. He screams back at his. I'm not sure what I do in that moment of choice. I am not able to silence its screaming, and can't say I just ignore it. I take a conscious breath in to remind myself that in this moment, I am in control of my body, and I choose to dive in. The real moment of choice happens in the second that I push off the ocean floor with my feet, spring upward and launch downward into the cold.

Be here now. 

When I plunge into freezing cold water, there is only right here and right now. I am painfully aware of my body. I can feel the blood vessels in my legs spasm and constrict, cutting the blood flow to my feet. The slightest hint of wind is offensive and I struggle to control my shivering. I am forced to look at my out of control thoughts, telling me how stupid I'm being for making my body so cold and trying they're damnedest to convince me to get out asap.

Meditation is in right now. It's -the- thing to do. Science has proven it can literally change your brain. But man is it hard. It's so hard to rein in your thoughts to focus solely on your breath, or 'om,' or however you choose to meditate. I think most people think meditation is about focusing, but to focus means to eliminate awareness.

Mark Twight says that meditation is "cultivating an intense state of awareness." And to be fully aware, we must also be fully present. I won't say that simply dunking yourself in cold water is like meditating, but it does bring you right into the present and holds you there. It's kind of a hack into presence. If you can live there for a bit, look around and explore the place, you'll begin to cultivate awareness within presence.


Connection
I believe we humans feel best when we are connected- to self, to nature, and to others.

Self
That snap into the present that cold immersion achieves brings the mind fully into the body. Mentally, you are nowhere other than in your body, in the cold. There is no daydreaming, no worrying about what to make for dinner or that dumb thing you said yesterday. For me, I become very aware of both the connection of, and distinction between, my mind and body. Feeling fully present means feeling truly alive, and flexing my mind's power over my body allows me a deeper understanding of the connection between them.

Nature
We stood on the beach, wrapped in towels and trying not to shiver, considering our next move. I was thinking about how I'm so much more willing to be cold when it involves swimming in a natural body of water, and how much easier it is than a cold shower. Matt's thoughts were in the same place.

"Its funny how different that is from a cold shower. You know, a cold shower is entirely mental, its all self discipline. You have to choose to turn the water colder. That [ocean] water is already cold. You either get in or you don't."

Ah-hah. This experience is authentic. The ocean is as it is, and we are as we are. There is nothing contrived. We immerse ourselves in a wild, naturally cold thing over which we have no control.
We form authentic connection with nature through wild swimming.

Community
Our little tribe did something challenging together, and we became closer because of it. Doing challenging things with my partner and friends makes me feel so much closer to them, and so much stronger and braver. We connect with others through shared experience.


Did this post inspire you? Do you want more inspiration and motivation? Click the photos to snag the books that inspired me!


Are we addicted to comfort?

I admit that addicted might not be the best word, but it’s unfortunately the closest in the English language to describe what comfort is doing to us. I suspect German may have a better word. When we are addicted to something, we need more and more of it to feel the same effects. We’ve made our modern lives as comfortable as technology allows, and we’ve cocooned ourselves. The deeper into the cocoon we go, the more sensitive we become to smaller and smaller levels of discomfort. 

Our bodies are actually incredibly good at adapting, but we insist on keeping the thermostat at 70° year round. We curse the heat in the summer and then again curse the cold in the winter- making ourselves miserable year-round unless we are indoors. We’ve long exchanged sustainably warm wool for snuggly, plush polyester and nylon. 

Let me explain with an example from my past. I used to lead sea kayaking expeditions during the summer on the coast of North Carolina. I spent six to seven hours a day sitting in my narrow kayak paddling in 100 degree heat. We camped each night on a beach. Everything was covered in salt and sand, and there were always mosquitoes stalking our every move. My memories from my first trip were of how gritty everything felt all the time, how itchy and prickly my skin was, how the heat was suffocating and the headwind exhausting. It was radically uncomfortable, but also beautiful and epic. By the end of the summer, I didn’t even notice the grit and I was accustomed to the heat. I have a distinct memory of walking into my house barefoot and marveling at how soft the carpet was. To me, the pristine white sand was soft- but the carpet in my dilapidated college rental was impossibly, remarkably soft. I was so accustomed to the heat, I had to take a fleece jacket out to dinner to tolerate the air conditioning in the restaurant.

It is currently winter, and I’m not leading outdoor trips at the moment. As I walk into the grocery store in fleece pants and a fleece jacket on a windy 36 degree day, I feel piercing cold when the wind blows. I haven’t spent enough time outside over the last two months for my body to acclimate to the change in temperature. I’m hyper-sensitive to the discomfort, and my brain resists hard (aka screams) when I try to force it to adapt by wearing less clothing on cool days, taking warm-not-hot showers, and turning down the thermostat. It’s SO EASY for me to avoid discomfort and therefore requires an enormous amount of discipline to not make myself more comfortable by flipping a switch or staying inside. 

I would argue that we’re all generally worse off for this extreme level of comfort. Climate controlled homes are great at keeping us from dying of hypothermia, and are critical for public health and safety. Our comforts are life savers for those of us with chronic illness and with disabilities. I am thankful for running water, electric heat and a gas stove when I'm sick or overwhelmed from work.  But for many of us, we’re making ourselves more miserable year round by avoiding the discomfort of acclimatizing. So bump your thermostat closer to outside temps, get outside when the weather isn’t perfect, and marvel at your body’s ability to adapt. 

Video: Paddle Boarding to Climb a Magical Tree

It is so hard to pick a favorite tree, but this one just might be mine. The only way to get to it is by water, and it reaches down to the water's surface with big strong branches to let us climb up. I can't think of a better way to have celebrated the Autumn Equinox than by enjoying a paddle in the sunshine and fellowship with a human I love and a beautiful tree.

Pitch Your Tent Like a Pro

Take the Right Tent
A tent in the wrong environment spells misery, no matter how well you set it up! 
  • High winds: (beach, mountain-top, plains) Take a low profile dome or pyramid. The lower the better! If you're camping on the beach, take a tent that's shorter than the dunes. 
  • Hot and humid: Two wall tent with as much mesh as possible means better ventilation. Go as big as you can get away with- a bigger tent won't get as hot.
  • Cold and dry: Single wall tents are warmer and more wind-resistant. Get the smallest one you fit in, because your body heat will keep a smaller tent warmer. 
  • Raining cats and dogs: Make sure your rain fly covers the tent entirely and reaches all the way down to the ground. A vestibule (a covered 'porch' area under the rain fly) is a gear saver in wet weather.
Follow the Video for the Perfect Pitch
Can't watch the video? Keep reading...


Pack Before you Go
Unpack, and then re-pack
  1. Unpack: and separate the tent, poles, rain fly, footprint and stakes
  2. Stuff don't roll: stuffing protects the waterproof coating on your tent and rain fly
  3. Stuff in opposite order: rain fly at the bottom, poles on the side, then tent, then footprint, then stakes
Use the Right Tools
Buffy chose the right stake for killing vampires.
You should pick the right stake for your campsite
The stakes are high.....
See what I did there?! But seriously, you need the correct type of stakes for the environment you're camping in. Those cheap aluminum stakes your tent came with? Leave them at home.
Forests and general use: MSR Groundhog Tent Stakes are super strong and won't bend when you hammer them, and resist being pulled out due to their design
Sand: 12" Sand Stakes because bigger is better


Set-up in this order
  1. Stake it first: Stake out the footprint and tent, with the narrow side into the wind. Stake down the windward side first. 
  2. Poles: Set up the poles and connect the tent to the poles
  3. Rain fly: Put the rain-fly on the tent and connect it. Connect the windward side first.  
  4. Guy lines and vestibules: Stake out all the guy lines and vestibules to make your tent strong against the wind, and to keep the rain fly tighter. A tight rain-fly will shed water and is less likely to leak. 
Did you find this post helpful? If you did, consider supporting me by buying me a coffee here:

Buy Me A Coffee


Super Powers and Full Frontal Nudity
(Sorry Mom and Dad)

This is the story of how I discovered my super-power, and how I am unable to share the single best photo of myself because in it, I was naked. If you’re wondering what this has to do with adventure, just keep reading. 


By August of 2013, my friends in North Carolina were accustomed to my being out of the country more than I was than in it. I had spent the better part of a year working as an outdoor educator in Oman, did a high altitude trek in Nepal, and then spent the summer in California teaching horseback riding. Two close friends from high school decided that this was the perfect moment for an epic road trip. They flew to meet me in San Francisco and the three of us drove back east, trying to pack in as many sights and shenanigans as we could. 


On the first day of our trip, one friend hesitantly shared with us a goal she wanted to achieve, that she could not fulfill without our help. She wanted to be photographed naked in the desert. This wasn’t a sexual thing- it was about freedom and artistic expression. We said yes without hesitation. What are friends for, if not to help you live your best, weirdest life?

Blissful Beach Camping

how to beach camp
Beach camping in Hong Kong
Beach camping is one of those outdoorsy things that sounds like a great idea. Spend your day fishing, swimming, and soaking up the sun then drift off to sleep to the sound of the crashing waves after a glorious sunset.

Our imaginations tend to gloss over the not-so-nice realities of our daydreams. Just like dreaming of moving to Paris means you'll have to learn French and pay 5 euros for a coffee, camping at the beach comes with a few challenges that can make for a miserable time. Has one of your beach camping trips ended in disaster or misery?
Things that (usually) Suck about Beach Camping
  • Sand gets EVERYWHERE, in EVERYTHING
    The worst line in any Star Wars movie? I think so.
  • It's hot
  • Sunscreen is sticky and gross
  • There are bugs that bite
  • Your tent blows away in the wind, or leaks when it rains
So while I can't magically make any of those things go away for you, I can share the tricks I've learned that make camping on a beach actually really wonderful.


Headache Free Vacation Photos- Document Your Adventure without the Hassle


My cousin is heading on a trip to Hawaii and asked me for info on what GoPro I'm using and what accessories I use most. I thought y'all might find the info useful too!

Balancing Experiencing with Documenting
I choose to be okay with using the best photo of the actual experience instead of impacting the experience to get the shot I want.  


Set it and forget it...
I am always sensitive to how documenting an experience can impact the experience itself. I'm sure you have all heard the horror stories of people so obsessed with getting 'the shot' that they ruin their honeymoons, or worse, fall off cliffs. The way I get most of my shots in the moment is by setting my GoPro on video at an angle I think will get me something good, and then focus on the experience. I think it is okay to spend a second or two adjusting the camera angle, but I try not to get too hung up on getting a specific shot. Instead, I set it on video, try to ignore it, and just pull whatever the best stills are later. I also sometimes shoot while I am teaching, in which case I cannot pay any attention to the camera. Sometimes when I am teaching, I end up not being able to use any of the footage, but that's ok, because teaching is the primary focus of that experience, and any photos I might get are just a bonus.

Guidelines for 'Set it and Forget it' success:
  1. Use a wide angle lens or camera (like a GoPro)
  2. Set the camera in a good location to capture the action- with a wide angle lens, a little closer to the action than you would a traditional camera
  3. Set it on video and try to ignore it
  4. Use either the camera software or use Video to Photo- Grab HD Frame  app to pull stills from the video after your adventure


5 Awesome Micro-Adventures in the Triangle

mi·cro - ad·ven·ture: noun 1. an unusual and exciting experience or activity of short duration, achievable by normal people with busy lives 

Climb Lake Raleigh Boulders
Itching to get on real rock, but don't have the time to head West? Get immediate satisfaction at the Lake Raleigh Boulders. They aren't super tall, and only have a handful of problems, but they're a fun way to spend an afternoon.

Getting There
Park at Centennial Campus Middle School in the far corner by the woods. Go into the woods and turn left on the forest 'road.' About 100 feet down that path, you'll see an obvious trail on your right heading into the woods. Follow that trail downhill and to the right to eventually meet up with the Lake Raleigh TrailOnce you hit the Lake Raleigh Trail, turn left and follow it until it dead-ends at the boulders and Walnut Creek. 


Need to Know
You'll need to bring your own crash pad and spotter. One of the routes has a large pointy rock underneath, so multiple crash pads make the landing safer. If  the weather has been rainy recently, the rock is likely to be too wet to climb. Here is a link to the info on Mountain Project. *NOTE: Don't follow the 'getting there' directions on MTN Project as of 4/9/19, follow the directions above

Float the Neuse
A lazy afternoon float in early summer
The Neuse river is a (usually) slow moving river winding its way through Wake County. You'll float at a leisurely pace to the sound of songbirds. We spotted beaver, deer and osprey on our 3 hour float in early June.

Getting There
We only had a short afternoon for our float, so we chose a small section. Wal-mart had cheap floats for $10 each that we grabbed right before we headed out. They even had a float for the cooler! I used my sea kayaking tow line to keep our three floats connected. It took us about 3 hours to float the 2.5 mile section from the Poole Road Canoe Launch to the bridge at Auburn Knightdale Road. The city of Raleigh has a handy list of access points here. You'll need two vehicles or a friend to help with shuttling.

Need to know
Never float this river at flood stage- it is full of submerged trees that turn into dangerous strainers and the river is deceptively fast and powerful at that height.  You can check the river levels online by typing "Neuse River water levels" and the town you plan to float near into a Google search. The Neuse is notoriously dirty, so avoid floating after heavy rains. It is a good idea to wear shoes instead of flip flops as there are often sharp rocks when getting in and out. Avoid super low levels, as you'll just drag your butt the whole time.

Wild Swim in Sennet's Hole
On a sunny day in April, the water was still cold and
we had the place to ourselves
This is a gorgeous swimming hole along the Eno river, where large smooth rocks emerge from the river make you feel a little closer to the mountains.

Getting There
The optimal access is via the South River Trail (0.6 miles) to where it meets up with Sennet Hole Trail (0.3 miles) Access to the South River Trail begins in a designated parking lot off of Roxboro street.
There is a shorter route via the Sennet's Hole Access Trail which is 0.3 miles, BUT there is not designated parking, and you won't find a spot on a warm sunny day. 

Need to Know
Water quality and flow levels of the river are important to safe swimming. If there has been lots of rain recently, check the river level data available from the USGS here. Avoid swimming until the water levels have come back down to normal after flood stage. This is a SUPER popular spot, so expect to share the bank and the water with lots of other people during the heat of the summer.
Forage for Wild Edibles with Piedmont Picnic Project
A Piedmont Picnic-er with a bountiful persimmon harvest
photo credit @PiedmontPicnic
Piedmont Picnic Project connects people to their food through hands-on experiences that build skills and community. Commune with deeply rooted food traditions, nature, and a vibrant community through foraging and creating your own foods. Foraging along the greenway deep within the city feels like discovering hidden treasure. I had great time exploring and laughing with new people.

Need to Know
While there is always something to harvest year-round in North Carolina, opportunities for foraging are more plentiful beginning in the Spring. Expect to forage for leaves and flowers in the spring, fruits in the summer, and nuts in the fall. Other learning opportunities include learning to ferment, can, and pickle.

Find out about upcoming Piedmont Picnic Project events below:

Paddle Robertson Millpond
Roberston Millpond is the only bald cypress blackwater swamp in Wake County. Paddling through a cypress swamp feels like floating through a forest on a black mirror.
Need to Know
Bring your own boat to get on the water any time the preserve is open. Hours of operation and more info is available here. Life jackets are required to be worn at all times while on the water. If you don't have your own boat, Paddle Creek offers rentals from mid April to mid October on Saturdays. To schedule a rental, visit their website here.

Did you find this post helpful? Help support this blog here:

Buy Me A Coffee