


What you need to mark and cut
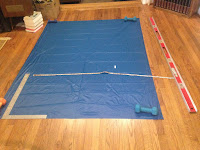
Marking the outer shell- Spread your fabric out on a smooth flat surface like a hardwood or smooth tile floor and hold it down with weights.
I used a fine point sharpie to mark the shell because I knew that any marks would be hidden in the seam allowance. If you need to mark on a part of the shell that will show, use tailors chalk because it wipes away. Otherwise, the mark will show on your final quilt. The 'disappearing markers' you can get for marking fabric don't work on slippery ripstop nylon.
The shell / outer fabric needs to be cut slightly larger to allow for the loft (thickness) of the insulation. This is called a differential cut because the shell and liner are different sizes. If you don't do this, you may sacrifice some warmth as the insulation gets squished between the fabrics. I read somewhere that the general rule of thumb is 2x the loft of your insulation. So if your insulation is 1.5" thick, you want to add 3" of width. I read on an online forum that double the loft is overkill for synthetic, so I'm only adding 1.5x the loft.
Additionally you will need to add a seam allowance. I want a 1" seam allowance to make it easier to sew the bulky insulation. I'll cut away the extra insulation after I finish sewing and the 1" of shell and liner seam allowance will be insignificant in bulk and weight.
Here is the equation for figuring total width, if you want to use the full differential for loft.
For total length, add at least 3" to both the top and bottom to use as a casing for bungee cord later on.
Marking the Lining Fabric- The lining fabric does not require as much math. Simply add a 1" seam allowance to both sides and at least 3" at both the top and bottom.
Marking the Insulation- I added a 1" seam allowance to each side of the insulation and cut the length
to the exact measurement of your desired final length. I felt that 1" of seam allowance would make sewing easier. I can cut the extra bulk away after I'm finished sewing.
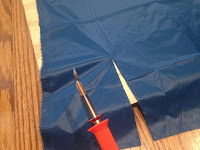 Cutting the fabrics- I used my Weller Woodburner that came with a knife attachment to cut my fabric and it worked like a dream. Cutting was much easier than I anticipated it would be. I found a small square piece of plywood that I used underneath the fabric as a cutting surface. Glass or metal would work too, but few of us have a nice smooth flat piece of glass lying around and the wood worked perfectly.
Cutting the Insulation- If you have rough calluses on your hands, grab some fine sand paper and smooth them down so they don't 'grab' the insulation. Moisturizing your hands prior to handling the Climashield will also help reduce 'grab.'

- Weller Woodburner or a hot knife. Any nylon fabric needs to be cut with heat so that the edges are sealed and will not unravel. Even capturing the edge with a french seam only delays unraveling.
- Some sort of heat-resistant material to put under your shell and liner fabrics- either a piece of wood, metal or glass. A few people online have used scissors to cut the fabric and then sealed the edge with a lighter, but they say it is extremely easy to accidentally melt too much fabric.
- Good Sharp Fabric Scissors at least 9" long if you are working with thick insulation like I am. If your insulation is thinner, smaller scissors will work. Just make sure they're sharp.
- Permanent fine tip marker
- Tailors chalk
Differential Cuts and Seam Allowances
Marking the outer shell- Spread your fabric out on a smooth flat surface like a hardwood or smooth tile floor and hold it down with weights.

I used a fine point sharpie to mark the shell because I knew that any marks would be hidden in the seam allowance. If you need to mark on a part of the shell that will show, use tailors chalk because it wipes away. Otherwise, the mark will show on your final quilt. The 'disappearing markers' you can get for marking fabric don't work on slippery ripstop nylon.
The shell / outer fabric needs to be cut slightly larger to allow for the loft (thickness) of the insulation. This is called a differential cut because the shell and liner are different sizes. If you don't do this, you may sacrifice some warmth as the insulation gets squished between the fabrics. I read somewhere that the general rule of thumb is 2x the loft of your insulation. So if your insulation is 1.5" thick, you want to add 3" of width. I read on an online forum that double the loft is overkill for synthetic, so I'm only adding 1.5x the loft.
 |
| Shell Layout click to zoom |
Here is the equation for figuring total width, if you want to use the full differential for loft.
Final width + (1" x 2) + (loft x 2)
For total length, add at least 3" to both the top and bottom to use as a casing for bungee cord later on.
Marking the Lining Fabric- The lining fabric does not require as much math. Simply add a 1" seam allowance to both sides and at least 3" at both the top and bottom.
Marking the Insulation- I added a 1" seam allowance to each side of the insulation and cut the length
to the exact measurement of your desired final length. I felt that 1" of seam allowance would make sewing easier. I can cut the extra bulk away after I'm finished sewing.
Measure Twice, Cut Once

Cutting the Insulation- If you have rough calluses on your hands, grab some fine sand paper and smooth them down so they don't 'grab' the insulation. Moisturizing your hands prior to handling the Climashield will also help reduce 'grab.'
- I found that putting my insulation on the carpet created enough friction to hold it in place while I marked and cut. If you have to work on smooth floors, it might be a good idea to put a couple of weights in the center of your quilt to hold it in place. Just don't put them near the lines you'll be cutting or you'll get weird uneven edges.
- Mark your cutting lines with a sharpie, a straight edge and a square. I was lucky and the level I used as a straight edge was the exact length I wanted to make my quilt.
- Cut your insulation with very sharp fabric scissors. You may be able to take a big straight edge, press down the insulation and cut it on a mat with a rotary cutter or utility knife, but I didn't go that route. It was easy to cut with fabric scissors.

Ready to keep going? Click the photo below for the next section